Creating Montessori toys at home gives you a way to provide exactly what your baby needs for development while avoiding the unnecessary complexity that manufacturers add to justify premium prices. Saving money is certainly a welcome benefit, but the real value comes from understanding developmental stages and providing materials that match them.
To create effective DIY Montessori toys, you need to understand the core principles that make these materials work. You’ll focus on natural sensory experiences, match toys precisely to your baby’s developmental stage, and embrace the radical simplicity that allows deep concentration and genuine learning.
Most of what you need is probably already in your home.
Understanding What Makes Montessori Materials Different
When I first started researching Montessori toys, I kept seeing the same descriptions repeated: “purposeful,” “simple,” “natural.” It took actually observing my daughter with different toys to understand what those words really meant in practice.
Traditional commercial toys are designed to entertain. They flash, beep, sing, and do the work for the child. Montessori materials are fundamentally passive.
They don’t do anything on their own.
The child must act upon them, and in that action lies the entire learning experience.
This passive quality makes them powerful for development. When you hand a baby a plastic toy that lights up when they touch any button, they learn that random actions produce exciting results.
When you hand them a wooden ring stacker, they learn that specific, purposeful movements are required to achieve their goal.
The latter builds problem-solving skills, spatial reasoning, and genuine cause-and-effect understanding.
The theoretical foundation goes back to Maria Montessori’s observation that children learn through repetitive, focused interaction with their environment. She noticed that when given appropriately challenging materials, children would work with them repeatedly, refining their movements and understanding.
This concentrated attention, what she called “normalization,” could only happen when toys weren’t constantly interrupting the child’s focus with lights and sounds.
From a practical standpoint, this means your DIY creations should have a single, clear purpose. A grasping toy should be about grasping.
A stacking toy should be about stacking.
Don’t try to mix counting, colors, shapes, and motor skills into one overwhelming object.
The challenge most parents face is fighting their own instinct to maximize “educational value.” We’ve been conditioned to think more features equals more learning. In reality, the opposite is true for babies.
The simpler the toy, the deeper the engagement.
I’ve watched my daughter ignore elaborate toys with fifteen different functions in favor of a simple wooden spoon. The spoon offered clear feedback, predictable properties, and endless possibilities for exploration without overwhelming her developing nervous system.
Matching Materials to Developmental Windows
I learned this lesson the hard way when I spent two hours creating an intricate shape-sorting box for my six-month-old. She completely ignored it.
The toy wasn’t wrong, the timing was wrong.
She wasn’t developmentally ready for that level of problem-solving.
Understanding sensitive periods, those windows when children are naturally primed to develop specific skills, changes how you approach toy-making. Instead of creating what seems educational, you create what your baby is actually ready to master.
For newborns through three months, visual development dominates. Their world is blurry, and they’re just beginning to focus and track objects.
High-contrast images in black and white provide optimal stimulation because their developing visual system can actually process these stark differences.
Color comes later.
I created a set of simple black-and-white cards using cardstock and a thick marker. Geometric patterns, bold stripes, concentric circles, checkerboards.
Total cost was about three dollars.
I’d prop these cards near my son during tummy time or attach them to the side of his play space. The difference in his visual attention compared to colorful toys was really dramatic.
He’d stare at those simple patterns for extended periods, his eyes working to focus and track.
Between three and six months, babies enter the grasping phase. Their hands, previously balled into fists, start opening purposefully.
They reach for objects with increasing accuracy.
This is when tactile exploration becomes critical. They need objects that feel different, have varying weights, and provide sensory feedback.
I gathered wooden spoons from the kitchen, soft fabric scraps from old clothes, smooth stones from the garden (thoroughly washed and large enough to be safe), and metal measuring cups. Each item offered a completely different sensory experience.
The wooden spoon was warm and light.
The metal cup was cool and made a different sound when tapped. The fabric was soft and could be manipulated in ways the rigid objects couldn’t.
The practical application here is creating what Montessori educators call a “treasure basket.” You fill a low, stable basket with 8 to 12 safe household objects of varying textures, weights, and materials. The baby sits supported (or lies on their stomach for younger babies) and explores each item at their own pace.
I rotated items weekly to maintain novelty.
From six to twelve months, everything shifts toward mobility and cause-and-effect understanding. Babies this age are learning that their actions produce predictable results.
Drop a spoon, it falls.
Bang two objects together, they make sound. Stack blocks, they create height (and can be knocked down).
This is when simple cause-and-effect toys become valuable. I took a sturdy cardboard box and cut holes in the top just large enough for fabric scarves to pull through.
My daughter would spend twenty minutes pulling scarves out, examining them, then eventually trying to stuff them back in. The beauty was in the simplicity.
Pull equals scarf appears. Push equals scarf disappears.
The challenge during this stage is safety. Babies are mobile, putting everything in their mouths, and remarkably strong.
Every DIY toy needs to withstand serious testing.
I learned to check everything twice, sanding wooden edges until they were completely smooth, securing fabric tightly, avoiding anything small enough to pose a choking risk.
Creating Sensory-Rich Experiences Without Overstimulation
There’s a really fine line between providing rich sensory experiences and creating overwhelming chaos. Commercial toys often cross that line, combining textures, sounds, lights, and movements into a cacophony that actually prevents focused attention.
The Montessori approach isolates sensory experiences so children can concentrate on one quality at a time. This isolation of difficulty, focusing on a single variable, allows deeper understanding and skill development.
I created a series of sensory bottles using small glass jars (plastic works too, but glass provides better visual clarity). Each bottle contained a different material: one had rice, another dried beans, another small bells, another water with glitter.
I secured the lids with strong adhesive to prevent any possibility of opening.
Each bottle offered a distinct sensory experience. The rice made a soft shushing sound.
The beans created a louder rattle.
The bells chimed musically. The glitter bottle provided pure visual stimulation as the glitter slowly settled after shaking.
My son would choose one bottle, shake it repeatedly, watch or listen intently, then set it down and choose another. He was making comparisons, understanding differences, categorizing his sensory world.
This wouldn’t have been possible if all those elements were combined into a single toy.
For tactile development, I created texture boards using sturdy cardboard and various materials glued securely to the surface. One board had sandpaper.
Another had soft felt.
Another had corrugated cardboard. Another had smooth laminated paper.
Each board was about six inches square, easy for small hands to hold and manipulate.
The theoretical background here relates to how the brain processes and categorizes sensory information. When experiences are isolated, neural pathways strengthen more efficiently.
When everything happens simultaneously, the brain struggles to differentiate and categorize.
From a practical standpoint, this means resisting the urge to make complex multi-sensory toys. Create separate experiences.
One toy for sound exploration.
A different toy for texture. Another for visual tracking.
The variety comes from having multiple simple toys, as opposed to making person toys more complex.
The potential problem parents face is boredom, their own boredom, not the baby’s. Adults find simple toys tedious because we’ve already mastered those concepts.
We’ve internalized what “soft” means, what “loud” sounds like, how objects fall.
For babies, every single one of these experiences is novel and fascinating.
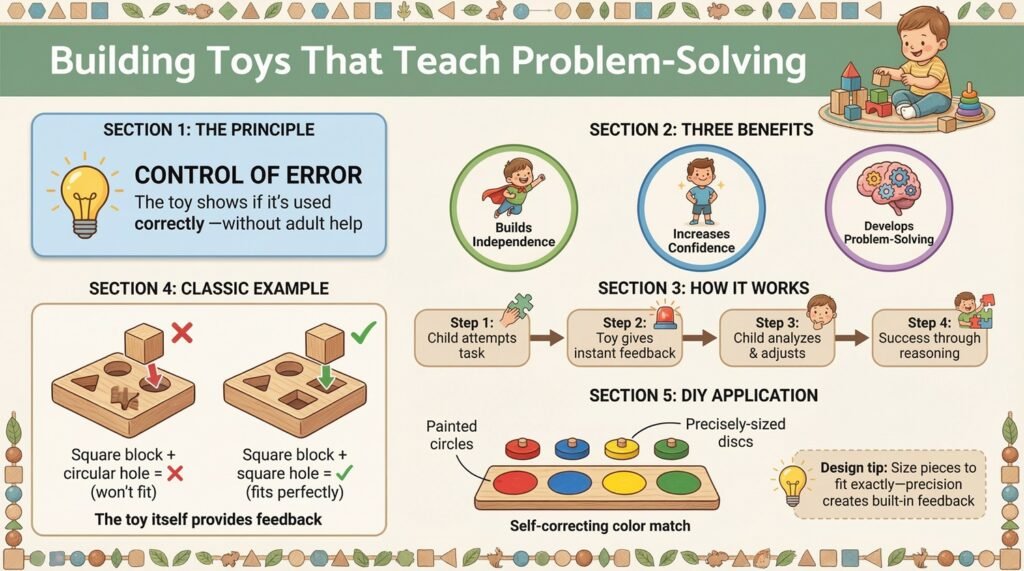
Building Toys That Teach Problem-Solving
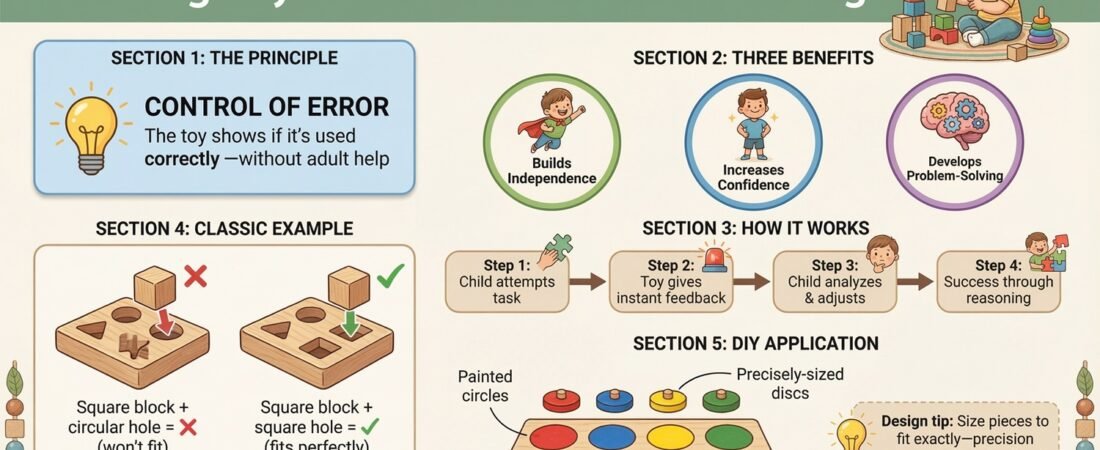
One of the most valuable Montessori principles is what’s called “control of error.” This means the toy itself shows whether the child has used it correctly, without adult intervention. This builds independence, confidence, and genuine problem-solving ability.
A shape sorter is the classic example. The square block won’t fit through the circular hole no matter how hard the child tries.
The toy itself provides feedback.
The child learns to analyze the problem, try different approaches, and eventually succeed through their own reasoning.
Creating control of error in DIY toys needs thoughtful design. I made a simple color-matching activity using wooden discs and a board painted with corresponding colored circles.
The discs were sized to fit exactly on the circles.
My daughter had to match the red disc to the red circle, the blue to the blue, and so on.
The control of error was built-in. If she placed the blue disc on the red circle, it covered the red, but the blue circle remained empty. The visual mismatch indicated an error.
She could self-correct without me saying, “No, that’s not right.”
This concept extends beyond puzzles and sorting. A nesting toy (boxes or cups of graduated sizes) has control of error because they only stack properly when ordered correctly.
A threading toy where fabric must pass through specific-sized holes provides immediate feedback about what works and what doesn’t.
The theoretical foundation here relates to developing internal motivation as opposed to dependence on external validation. When children rely on adults to tell them if they’re fix, they learn to seek approval as opposed to developing their own judgment.
When the material itself provides feedback, they learn to trust their own assessment and continue through challenges.
I created a simple balance activity using a wooden board balanced on a small block (like a seesaw). I provided small objects of varying weights.
My son would place items on each end, watching what happened. Heavy items made one side drop.
Matched weights kept balance. The activity itself demonstrated the principle without my explanation.
The practical challenge is ensuring the control of error is obvious enough for your child’s developmental stage. A subtle mismatch won’t register for younger babies.
The feedback needs to be clear and immediate.
The Practical Reality of Material Selection
I’m really passionate about natural materials, but I’m also practical about cost and accessibility. You don’t need to source exotic woods or organic fabrics to create effective Montessori toys.
Walk through your home with fresh eyes. Your kitchen is full of perfectly suitable items.
Wooden spoons, metal whisks, silicone spatulas, measuring cups and spoons, pasta in sealed containers.
Each offers different sensory properties. The wooden spoon is light and warm.
The whisk is heavier and cool.
The silicone spatula is flexible in ways other objects aren’t.
I created an entire kitchen-themed treasure basket using only items we already owned. Total cost: zero dollars. My daughter explored these items with the same concentration she would have given expensive Montessori materials.
Fabric scraps from old clothes provide endless possibilities. I cut squares from worn-out t-shirts, old flannel pajamas, denim jeans, and silky scarves.
Each fabric type feels completely different.
I tied several together to create a fabric chain that my son could pull apart and manipulate. Later, around eighteen months, these same fabric pieces became part of sorting activities (group all the soft ones together, all the rough ones together).
Cardboard boxes, especially sturdy shipping boxes, transform into multiple toy types. Cut a series of differently sized holes in one side, and it becomes a shape-exploration box.
Cut a slot in the top, and it becomes a posting box where children practice inserting flat objects.
Leave it intact, and it becomes a container for other toys, supporting the Montessori principle of order and organization.
Natural items from outside offer incredible sensory variety, though they need more careful safety consideration. Smooth stones, thoroughly washed and large enough to be safe, provide weight and coolness.
Sticks, sanded smooth and cut to safe lengths, offer a different wood texture than manufactured items.
Seed pods, pine cones (check for sharp edges), and interesting leaves can be temporarily added to treasure baskets for supervised exploration.
The challenge with natural outdoor materials is cleanliness and durability. I wash everything thoroughly, check regularly for deterioration, and replace items that become damaged. Nothing stays in rotation permanently.
For parents wanting to purchase materials specifically for DIY projects, craft stores offer untreated wood pieces relatively inexpensively. Wooden rings, blocks, discs, and dowels can be purchased in bulk.
The key is ensuring they’re untreated or finished with food-safe, non-toxic sealant.
I spent about thirty dollars on a collection of wooden pieces that I’ve used to create dozens of different toys over two years. Wooden rings became a stacking toy.
Wooden discs became a sorting activity.
Wooden dowels cut to different lengths became a size-comparison activity. The return on that investment has been substantial.
Implementing Strategic Toy Rotation
Having dozens of toys available simultaneously actually reduces engagement. Children flit from one to another without deep exploration.
The Montessori approach emphasizes fewer, more carefully selected materials.
I implemented a rotation system when my daughter was about five months old and have maintained it ever since. I created four different toy collections, each with five to seven items.
Every two weeks, I rotate to the next collection, storing the previous one out of sight.
The difference in engagement is really remarkable. When the “new” toys appear (even though she’s seen them before), she explores them with fresh interest.
Items that were ignored in previous rotations suddenly capture her attention because she’s developmentally ready for them.
This strategy has multiple practical benefits beyond engagement. It drastically reduces clutter, which matters both for the child’s ability to focus and for parental sanity.
It means you need fewer total toys since each gets more meaningful use.
It extends the life of each toy since wear and tear is distributed across longer periods.
The challenge is remembering what you’ve stored and when to rotate. I keep a simple list on my phone noting what’s in each collection and which is now in use.
Every other Sunday, I swap collections.
This approach also allows you to create toys gradually as opposed to feeling overwhelmed by making everything at once. I add one or two new DIY creations to the rotation each month.
Over time, this builds a substantial collection without requiring huge time investment at any single point.
For parents concerned about children becoming bored, I’d encourage you to observe more carefully. True boredom with an appropriate toy usually shows either overstimulation from having too many options or developmental readiness for the next stage.
It rarely means you need more toys.
People Also Asked
What are Montessori toys for babies?
Montessori toys for babies are simple, passive materials made from natural elements like wood, fabric, and metal that encourage independent exploration and skill development. Unlike electronic toys that flash and make sounds automatically, Montessori toys need the baby to act upon them.
A wooden grasping ring, a fabric ball filled with rice, a metal measuring cup, these items allow babies to explore textures, weights, and cause-and-effect relationships at their own pace.
The defining characteristic is simplicity with a single clear purpose.
How do you make homemade baby sensory toys?
You can make homemade sensory toys using materials already in your home. Create sensory bottles by filling clear containers with rice, dried beans, or water with glitter, then sealing them securely.
Make texture boards by gluing different materials (sandpaper, felt, corrugated cardboard, smooth paper) onto sturdy cardboard squares.
Assemble a treasure basket filled with safe household items like wooden spoons, metal whisks, fabric scraps, and smooth stones. For younger babies, create high-contrast visual cards using black and white geometric patterns drawn on cardstock.
Each toy should isolate one sensory experience for deeper engagement.
What can I use instead of buying Montessori toys?
Instead of buying Montessori toys, raid your kitchen for wooden spoons, metal measuring cups, silicone spatulas, and various utensils. Use fabric scraps from old clothes to create texture exploration materials.
Repurpose sturdy cardboard boxes into posting boxes or shape sorters.
Collect natural items like smooth stones and sanded sticks from outside. Craft stores sell untreated wooden pieces (rings, blocks, dowels) inexpensively that you can use for multiple toy types.
Most effective Montessori materials come from everyday household items that offer varied textures, weights, and sensory properties.
Are wooden toys better for babies than plastic?
Wooden toys offer several advantages for baby development. They provide varied sensory feedback, wood is warm to the touch, has natural texture, and makes different sounds when manipulated compared to plastic.
Wood is heavier, which helps babies understand weight and balance.
Natural materials connect babies to the physical world in ways synthetic materials don’t. Wood is also more durable and ages better than plastic.
However, the material matters less than the toy’s design.
A simple plastic cup can be more developmentally appropriate than a complex wooden toy with too many features.
When should I introduce Montessori toys to my baby?
You can introduce Montessori toys from birth, but the type changes dramatically with developmental stage. Newborns through three months benefit most from high-contrast visual cards placed near them during awake time.
From three to six months, introduce grasping toys and treasure baskets with varied textures as babies develop hand control.
Between six and twelve months, add cause-and-effect toys like posting boxes and simple stacking materials as babies become mobile and curious about how their actions produce results. Match each toy precisely to what your baby is developmentally ready to master.
How do I make a Montessori treasure basket?
To make a Montessori treasure basket, choose a low, stable basket or box that your baby can easily reach into while sitting. Fill it with 8 to 12 safe household objects made from different materials.
Include wooden items (spoons, blocks), metal objects (measuring cups, whisks), fabric pieces (different textures), and natural elements (smooth stones, sanded sticks).
Each item should be large enough to be safe, clean, and offer distinct sensory properties. Avoid plastic and electronic items.
Rotate items weekly to maintain interest.
Supervise your baby during exploration, but resist intervening unless necessary for safety.
What makes a toy Montessori approved?
A Montessori toy has several defining characteristics. It’s made from natural materials like wood, metal, or fabric as opposed to plastic.
It has a single, clear purpose as opposed to multiple functions.
It’s passive, requiring the child to act upon it as opposed to performing automatically. It includes “control of error,” meaning the toy itself shows whether it’s being used correctly.
It matches the child’s current developmental stage, being challenging enough to engage but not so difficult as to frustrate.
It’s simple in design without unnecessary decorations or features. It encourages concentration, repetition, and independent problem-solving.
How can I tell if a toy is developmentally suitable?
A toy is developmentally appropriate when your child engages with it repeatedly, showing focused concentration as opposed to brief interest followed by abandonment. They should be able to use it with some effort but not so much difficulty that they become frustrated and give up immediately.
Watch for signs of productive struggle, your child trying different approaches, persisting through challenges, and eventually succeeding.
If a toy is consistently ignored, it’s likely either too advanced or too simple for their current stage. Developmental appropriateness means the toy matches what your child is naturally working to master right now.
Key Takeaways
Creating effective DIY Montessori toys needs understanding that simplicity and natural materials produce deeper engagement than complex, manufactured choices.
Match every toy you create to your baby’s specific developmental stage as opposed to creating what seems educational or impressive to adults.
Build control of error into designs so the toy itself provides feedback, developing independence and problem-solving skills without adult intervention.
Implement strategic toy rotation to maximize engagement, reduce clutter, and extend the usefulness of fewer total items.
Natural materials from your home offer the same sensory benefits as expensive purchased items when thoughtfully selected and safely prepared.
Multi-stage toys that serve different purposes across developmental windows provide the best return on your creative investment.
Step back from intervention during play, allowing your baby to struggle productively and master challenges through their own effort as opposed to through your guidance or praise.