When you’re setting up sensory bags for babies and toddlers, the liquid you choose creates an entire experience that engages their developing senses while keeping them safe from the mess and potential hazards that come with open sensory play.
I’ve watched parents struggle with this question because they want something visually captivating and genuinely safe, especially for those little ones who still put absolutely everything in their mouths.
Selecting the right liquid for a sensory bag balances developmental benefits, visual appeal, practicality, and most importantly, safety. Some liquids create dynamic movement that teaches physics concepts.
Others provide tactile feedback that strengthens fine motor control.
And then there are combinations that do both while looking absolutely mesmerizing taped to a sunny window.
What makes this decision particularly interesting is that the “right” liquid changes depending on your child’s age, what skills you’re trying to develop, and honestly, how much risk you’re comfortable managing. Let me walk you through the options that actually work, along with some lesser-known choices that might surprise you.
Understanding Why Liquid Choice Matters
Before jumping into specific liquids, understanding what actually happens when a baby or toddler interacts with a sensory bag makes the whole process clearer. These aren’t just toys to keep kids occupied while you fold laundry, though they certainly help with that.
Sensory bags create contained environments where children can safely explore concepts that would otherwise be messy, dangerous, or both.
The liquid medium changes static objects into dynamic learning tools. A button sitting in an empty bag is just a button.
That same button floating in colored water becomes a lesson in buoyancy, color recognition, and cause-and-effect relationships as your child pushes it around and watches it respond.
The liquid creates resistance that builds hand strength and coordination. It provides visual feedback that helps developing brains understand that their actions have consequences.
I’ve found that parents often underestimate how much cognitive processing happens during what looks like simple play. When a nine-month-old squishes a gel-filled bag and watches the contents move away from their hand before slowly returning, they’re building foundational understanding of pressure, volume, and material properties.
These aren’t concepts they’ll name for years, but the sensory experience creates neural pathways that support later learning.
The challenge comes from the fact that different liquids create dramatically different experiences. Water moves quickly and unpredictably.
Gel moves slowly and returns to its original shape.
Oil separates from water in ways that fascinate both babies and adults. Each liquid teaches something different, which means your choice should align with what your child is developmentally ready to explore.
The Classic Water Approach
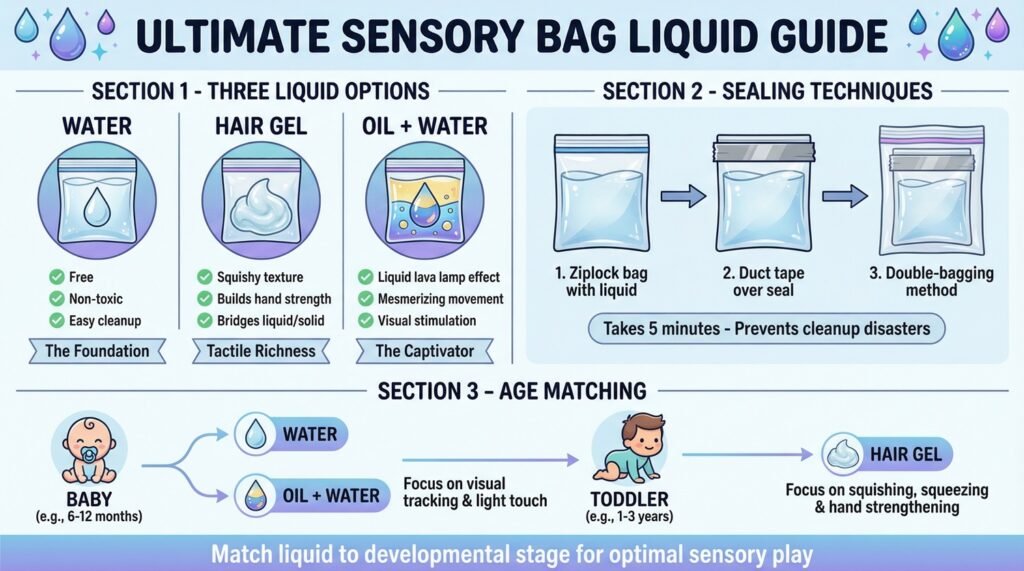
Plain water stays the foundation for sensory bag creation, and honestly, there’s good reason it’s so popular. Water is free, completely non-toxic if the bag breaks, and easy to clean up when (not if, but when) a bag eventually fails.
What makes water particularly valuable for sensory bags is its versatility. Clear water works beautifully for floating and sinking experiments.
Add small waterproof toys, buttons of different sizes, or plastic beads, and you’ve created a discovery bag where children can practice fine motor skills while learning object permanence and basic physics.
The items move easily in response to touch, providing immediate feedback that helps babies understand their ability to affect their environment.
Colored water takes the experience further by adding visual complexity. Food coloring changes ordinary water into vibrant blue oceans, red lava, or green swamps that engage visual processing centers in developing brains.
Liquid watercolors work even better than food coloring because they’re more vibrant and won’t stain as badly if there’s a leak.
I’ve seen babies spend twenty minutes just staring at brightly colored water moving in a bag, which might sound boring to adults but represents intense cognitive work for an infant.
The temperature of water adds another dimension. Room temperature water provides neutral tactile feedback, but slightly cool water (not cold, just cool) can be particularly engaging during hot weather and provides gentle sensory input that some children find calming.
Never use hot water, obviously, as it could weaken the bag material and potentially burn a child if it leaks.
One of my favorite water-based setups involves creating color-mixing bags. Fill one side of a bag with yellow-tinted water and the other with blue-tinted water, separated by a twist in the middle before sealing.
When a child manipulates the bag, the colors gradually mix to create green.
This teaches color theory concepts years before formal education begins, all through safe, contained play.
The main limitation of water is its lack of resistance. It moves so freely that it doesn’t provide much tactile feedback beyond wetness and temperature.
For very young babies who are just developing grasp strength, this can actually be perfect.
For older babies and toddlers who need more resistance to build hand muscles, you’ll want to consider thicker options.
Hair Gel for Tactile Richness
Clear hair gel creates an entirely different sensory experience that bridges the gap between liquid and solid. The thick, squishy consistency provides substantial resistance when squeezed, which builds hand strength more effectively than water while still allowing movement and exploration.
What makes hair gel particularly effective is its tendency to return to its original shape after manipulation. Push a pocket of gel to one side of the bag, and it slowly flows back to center.
This teaches cause and effect while also introducing the concept of elasticity.
The gel holds objects in semi-suspension as opposed to letting them sink or float freely, which creates visual interest and encourages focused searching behaviors.
I recommend using the cheapest clear hair gel you can find. The fancy expensive stuff works exactly the same as the dollar store variety for this purpose.
Make absolutely certain it’s clear gel as opposed to colored gel, as you’ll be adding your own colors through food coloring.
The transparency allows whatever you put inside to stay visible while the gel provides that satisfying squish factor.
Adding food coloring to clear gel creates jewel-toned bags that catch light beautifully. Mix the coloring thoroughly before sealing to confirm even distribution.
You can also create many colors in one bag by carefully adding dollops of differently colored gel, though they’ll eventually mix together with use.
Objects embedded in gel create treasure hunt opportunities. Small pom-poms, buttons, plastic insects, or sequins become targets for searching fingers to locate and manipulate.
The gel’s resistance makes this more challenging than finding objects in water, which is perfect for developing babies who need appropriately difficult tasks to stay engaged.
The durability of gel-filled bags tends to exceed water bags in my experience. The thicker consistency seems to put less stress on seams, and if a bag does develop a small leak, gel oozes out slowly as opposed to creating an immediate puddle.
This gives you more time to notice and address the problem before it becomes a major mess.
Temperature-wise, gel keeps cool temperatures longer than water, making it nice for sensory input during warm weather. Some parents refrigerate gel bags for twenty minutes before play to provide extra tactile variety, though you should always test the temperature yourself first to confirm it’s not uncomfortably cold.
Oil and Water Combinations
This is where sensory bags become genuinely mesmerizing. Combining water and oil in a single bag creates what I call a “liquid lava lamp” effect that captivates babies, toddlers, and honestly most adults who see it in action.
The science behind why this works is actually quite sophisticated, but the setup is remarkably simple. Vegetable oil and water don’t mix because of molecular polarity differences.
Oil molecules are hydrophobic, meaning they’re repelled by water molecules.
When you mix them in a sealed bag, they separate into distinct layers with the lighter oil floating on top of the denser water. As the bag is manipulated, the liquids break into bubbles that slowly recombine, creating constant visual movement and teaching basic physics concepts through observation.
The standard ratio I use is about two parts oil to one part colored water. Too much water and the effect isn’t as dramatic.
Too much oil and there’s not enough color contrast.
Food coloring should go in the water only, as it won’t dissolve in oil. Blue food coloring creates an ocean effect that’s particularly popular, but red makes a convincing lava bag and green works beautifully for jungle or alien themed bags.
The magic happens when you tape these bags to a window where sunlight can pass through them. The light illuminates both the colored water and clear oil, creating depth and visual complexity that flat opaque bags can’t match.
The movement of light through the liquids as they shift creates almost hypnotic patterns that provide extended engagement.
For slightly older toddlers, you can enhance oil and water bags by adding small waterproof objects. Plastic beads will sink through the oil layer into the water layer, teaching density concepts.
Glitter suspended in the water layer creates sparkle that contrasts with the clear oil.
Just avoid anything sharp that could puncture the bag from inside.
The sensory feedback from oil and water bags differs from pure water or gel bags. The two liquids create different resistance levels as they slide past each other, providing more complex tactile input.
The temperature difference between oil and water (oil tends to feel slightly warmer) adds subtle variation that developing sensory systems can detect and process.
Cleanup considerations matter with oil bags. If one does leak, you’re dealing with vegetable oil, which is slippery and needs soap for effective cleaning.
This isn’t dangerous, but it is more annoying than water cleanup.
This reality makes proper sealing even more critical for oil-based bags.
Proper Sealing Techniques That Actually Work
No matter which liquid you choose, the bag sealing method decides whether you’ll enjoy mess-free sensory play or suddenly be cleaning up an unexpected spill. I’ve learned these lessons through trial and error, and I can tell you that proper sealing is absolutely worth the extra five minutes it takes.
Start with gallon-sized freezer bags as opposed to regular storage bags or sandwich bags. Freezer bags are made from thicker plastic that’s more puncture-resistant and has stronger seams.
The gallon size provides enough space for interesting content while remaining manageable for small hands.
Fill the bag no more than two-thirds full. Overfilling creates excessive pressure on the seams and makes it harder to seal properly.
You want some air space (or ability to remove air) so the contents can move freely without straining the bag.
The zip-top seal is your first line of defense. Press it closed firmly from one end to the other, feeling for any gaps or areas where the closure might not be finish.
Run your finger along the entire seal twice, applying firm pressure.
This seems obvious, but I’ve seen countless bags fail because someone was in a hurry and didn’t properly close this basic seal.
Here’s where most people stop, but you shouldn’t. Duct tape should be your second line of defense, but it must be applied correctly.
The most effective method is to fold the sealed edge of the bag over itself, creating a folded seam, and then applying duct tape along the entire length of this fold.
This keeps pressure off the zip-top mechanism itself by distributing stress across a wider area.
Even better is the “sticky-side-to-sticky-side” technique. Cut a piece of duct tape about two inches longer than the bag’s width.
Place it sticky-side up on your work surface.
Fold the sealed bag edge over and press it onto half the exposed sticky surface. Then fold the remaining tape over the bag edge so the two sticky sides meet around the bag.
This creates an incredibly strong seal that’s more likely to survive aggressive play.
Reinforcement tape along all four edges, not just the top, provides extra insurance. Some parents use duct tape for this, while others prefer colored painters tape or washi tape for aesthetic reasons.
The reinforcement serves two purposes: it strengthens the entire bag structure and it provides a visual cue of the bag’s boundaries, which can help older babies and toddlers understand what they’re supposed to be manipulating.
Double-bagging multiplies your protection significantly. After sealing the first bag completely, place it inside a second gallon bag and seal that one using the same careful technique.
Yes, this uses more materials, but the peace of mind and extended durability make it worthwhile, especially for liquid types that would be problematic if spilled.
Age-Appropriate Liquid Selection
Choosing the right liquid becomes clearer when you match options to developmental stages as opposed to trying to find one universal solution.
For babies under six months, sensory bags have limited application since these infants are still developing basic motor control and spend most of their time on their backs or stomachs. If you do create bags for this age, simple clear water with high-contrast black and white objects works best.
The simplicity matches their developmental level, and clear water is the safest possible option.
Babies from six to twelve months are ideal sensory bag candidates. They can grasp and manipulate objects, they’re developing intentional movement, and they’re intensely curious about cause and effect.
This age group does best with water-based bags or oil-and-water combinations.
The rapid visual feedback from water movement matches their developmental need for immediate response to their actions. Hair gel works well too, providing more resistance for building hand strength while remaining visually clear enough to see embedded objects.
Toddlers from twelve to eighteen months can handle more complex sensory bags with thicker liquids like shaving cream or corn syrup. Their improved fine motor control means they can manipulate more resistant materials effectively, and their developing cognitive abilities allow them to engage with more subtle sensory differences.
This is also the age where color mixing bags become particularly educational, as they’re beginning to learn color names and can observe the concrete results of combining colors.
Older toddlers from eighteen months to three years can explore more elaborate sensory bags with many components or more complex liquid combinations. However, this is also when many children become more interested in trying to open bags to access the contents directly.
The mouthing phase typically decreases after eighteen months, but the curiosity phase intensifies, requiring even more robust sealing and closer supervision.
Frequently Asked Questions
Can I use baby oil instead of vegetable oil in sensory bags?
Yes, baby oil works well in sensory bags and creates similar effects to vegetable oil when combined with water. The main difference is that baby oil has a distinctive scent that some babies find calming, particularly if it’s used regularly during diaper changes or massage.
Baby oil is petroleum-based as opposed to vegetable-based, which makes it slightly different in viscosity.
Both work fine for the lava lamp effect, though baby oil tends to be more expensive than vegetable oil for the same results.
How long do water-based sensory bags last before they get cloudy?
Water-based sensory bags typically start showing cloudiness after one to two weeks at room temperature. The cloudiness comes from mineral deposits in tap water or early bacterial growth.
Using distilled water instead of tap water eliminates the mineral cloudiness issue.
Adding a single drop of clear dish soap to the water can help prevent bacterial growth and extend the bag’s clear appearance to three or four weeks. If you refrigerate water bags between uses, they’ll stay clear longer than room-temperature storage.
What’s the best liquid for babies who are still mouthing everything?
Plain water or hair gel are the safest options for babies in the mouthing stage. Water is completely non-toxic and rinses away easily if a bag breaks.
Clear hair gel is formulated for human contact and, while you wouldn’t want a baby eating it, brief exposure from a broken bag isn’t a medical emergency.
Avoid oil-based bags for very young babies since oil creates slippery cleanup situations. If you want absolute safety, stick with double-bagged water until your child moves past the intense mouthing phase around twelve months.
Can I reuse the liquid from a broken sensory bag?
You can reuse water, oil, or gel from a broken bag if it hasn’t been contaminated with dirt or small objects. Pour the liquid through a strainer to remove any debris, then store it in a sealed container until you’re ready to make a new bag.
Hair gel can be reused many times this way.
Water should be fresh if the old water looks cloudy. Oil reuses well as long as it hasn’t been mixed with water.
Shaving cream and corn syrup typically aren’t worth saving since they’re inexpensive and may have degraded in quality.
Do I need to add anything to water bags to prevent mold?
Adding a single drop of clear dish soap or a tiny splash of white vinegar helps prevent bacterial and mold growth in water-based sensory bags. The amount should be minimal, just enough to create a slightly hostile environment for microorganisms without making the water foamy or changing its appearance.
Even with these additions, water bags eventually develop cloudiness or growth, so plan to replace them every two to three weeks.
Using distilled water as opposed to tap water also reduces the likelihood of mold since it contains fewer organic materials.
What ratio of oil to water creates the best lava lamp effect?
The most visually striking ratio is about two parts oil to one part colored water. This creates enough color contrast to be interesting while providing enough oil volume for dramatic bubble formations.
Too much water makes the effect less dynamic since the oil layer becomes too thin. Too much oil overwhelms the colored water and reduces visual impact.
Start with this two-to-one ratio and adjust based on your preference. Some parents prefer equal parts for more color, while others use three parts oil to one part water for slower, more dramatic movements.
Can I put food items like pudding or yogurt in sensory bags?
Food items like pudding, yogurt, or applesauce work in sensory bags, particularly for babies already eating solid foods. The advantage is complete safety if a bag breaks, you’re dealing with actual food as opposed to chemicals.
Smooth pudding creates interesting texture and vibrant colors.
Yogurt provides similar consistency with natural white color that you can tint with food coloring. The major limitation is shelf life.
Even sealed in a bag, these food items can spoil within days at room temperature.
Refrigeration extends their usability to one or two weeks most, but they’re definitely temporary sensory bags.
How do I know if a sensory bag is too thick for my baby to manipulate?
Watch your baby’s engagement level and physical response. If they press on the bag once or twice and then lose interest, it might be too resistant for their current strength level.
If they seem frustrated or give up quickly, the liquid is probably too thick.
Babies should be able to create visible movement in the bag with reasonable effort. Start with thinner liquids like water and gradually progress to thicker options like gel as hand strength develops.
Each baby develops differently, so what works for a friend’s nine-month-old might not work for yours at the same age.
Key Takeaways
The best liquid for your sensory bag depends entirely on your child’s developmental stage, your safety comfort level, and what skills you’re hoping to develop. Water provides the safest, simplest option that works for nearly every age and situation.
Hair gel adds tactile richness and durability that water lacks.
Oil-and-water combinations create visual complexity that teaches physics concepts through observation.
Proper sealing matters more than any other single factor in sensory bag success. Double-bag liquid-filled sensory bags, use quality freezer bags as opposed to regular storage bags, and apply duct tape using the sticky-side-to-sticky-side method for maximum durability.
These steps transform sensory bags from short-term activities into long-lasting learning tools.
Match liquid complexity to developmental stage as opposed to trying to create the most elaborate bag possible. Young babies need simple visual input and immediate feedback that water provides.
Older babies benefit from the resistance and complexity of gel or oil-water combinations.
Toddlers can handle multi-element bags with various liquids and components.
Supervision stays essential regardless of how well you seal bags or how safe your liquid choices are. Sensory bags reduce mess and contain potential hazards, but they’re not completely risk-free.
Active supervision prevents small problems from becoming serious accidents and allows you to observe and support your child’s developing skills.